Concealer is a staple in any beauty routine, known for its ability to hide blemishes and brighten the complexion. However, the secret to a flawless concealer application lies not only in the product itself but also in the tools you use. In this tutorial, we'll focus on one of the most versatile makeup tools – the sponge. From selecting the perfect sponge to mastering the dab-and-blend technique, we'll guide you through each step on how to apply concealer with a sponge for a seamlessly natural finish. Whether you're a makeup novice or a seasoned enthusiast, these tips will help you elevate your concealer game to the next level. Let's get started on achieving that impeccable, airbrushed look!
How to apply concealer with a sponge?
How you apply your concealer will determine how perfect it will look. And remember, concealer is the most vital part of your makeup. If you do your concealer wrongly, your complete makeup will look dusty and ridiculous.
If you read my guide all about concealer brushes, you will notice most people use a concealer brush to apply and blend in their concealer. Concealer brushes are not the only tools you can use to apply a concealer.
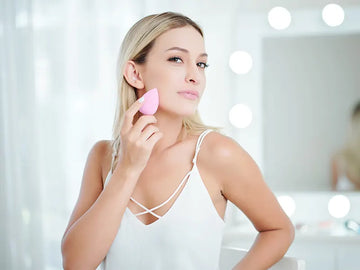
Beauty blenders or sponges are designed in a way you can use them to apply concealer under your eyes, or all over your face without struggling a lot.
If you have never used a beauty blender to apply concealer but you are interested in learning, I got you covered. I will give you a step-by-step procedure you should follow when applying concealer using a beauty blender.
Step 1: Prep your face
If you care any bit about your skin, them you wouldn’t put any makeup product on your face without prepping first.
- Scrub your face with a gentle face scrubber to remove all the oil and buildup. This in turn will open all your pores giving your skin a new chance to breath. Do not use a lot of pressure when scrubbing your face to prevent skin breakage.
- Cleanse your face with a gentle cleanser to remove all the scrub.
- Use a toner to help balance the chemicals on your skin responsible for your skin pigmentation.
- Apply some moisturizer on your face after toning to help keep your skin hydrated.
Basically, the prepping routine is what I normally do and my skin is perfectly okay. However, if you have a more detailed skin care routine, you can incorporate it before applying makeup.
Step 2: Prime your face
After prepping your face, the next step is to prime your face. A primer will create a safe smooth surface between your face and the makeup.
Do not use a silicone-based primer as it contains some alcohol content that will dry up your face. Instead, you will use a mineral-based primer. Apply the primer using clean hands or even a concealer brush to spread it perfectly.
Step 3: Apply a foundation
Use a fluffy brush to apply a foundation on your face. Dab the tip of the brush on your foundation.
Tap the brush with the foundation on your face until all the foundation is well blended.
Since the foundation does not offer the same coverage as a concealer, you should then go ahead and apply your concealer.
Step 4: Choose a cream concealer

If you are applying a concealer using a sponge, you should go for a cream concealer. Do not just use any concealer. You will need an under eye concealer, concealer for dark spots, and for your whole face.
Ensure you are choosing a concealer the right shade using concealer shade finders tools and our interesting guide here with instructions to select perfect shade for your skin.
Liquid concealer dries up faster. It’s for this reason you should pick cream concealer.
Step 5: Dampened the beauty blender
If you want the beauty blender to work perfectly when it comes to applying and blending concealer.
Put the beauty blender under a tap and let water run over it until it is wet.
You can the use the following procedure to apply concealer on your face.
- Clean your hands with warm water and soap to get rid of all bacteria from your hands.
- Use the tip of your ring finger to apply concealer on your eye lids. Do not drag your finger as you might cause the concealer go crease. Instead, tap the finger over the concealer until you are sure all the concealer is well blended.
- Take a concealer brush and apply it on your face using the dotting process.
- For the dark spots, use a concealer two shades lighter than your foundation. For contouring, use a concealer two shades darker than your foundation. And, for the rest of your face, use a concealer the same shade as your foundation.
- After you have applied the respective concealer on different places, you can then go ahead and start blending the concealer.
- Take the dampened beauty blender and start tapping the concealer on your face. A dampened beauty blender moistens the concealer making it easy to blend. It also locks in the concealer making it last longer than it would normally do.
- Tap the concealer and take your time until all the concealer is blended perfectly.
- Do not attempt to drag the concealer on your face as you might cause some creasing.
After blending in your concealer with a beauty blender your makeup will be semi waterproof.
You can then go ahead with the rest of your makeup.
You will find more about How to apply concealer on our master guide here.
Step 6: Apply a finish powder

Once your concealer is well blended it might leave some glossy look considering you are likely using a cream concealer.
To remove the glossy makeup look, you can use a finish powder to bake your makeup.
- Use a fluffy brush and a loose finish powder for this purpose.
- Dab in the fluffy brush in the loose powder and then tap your face with the brush.
- Let the powder sit on your face for a few minutes until the makeup is perfectly baked.
- This way the glossy makeup look will have been eliminated. After five minutes use the fluffy brush to remove the excess powder from your face.
Step 7: Apply a blush
After baking your face with a finish powder, your face will be somehow plain. To remove the plain look from your face, use a blush over your face.
- Take a thin brush with very few bristles and dab in the brush inside a blush.
- Do not use a lot of blush on your face since you will end up looking ridiculous.
- Also, don’t use a lot of pressure when applying a blush. Instead, just brush over the cheek bones to give your face a little bit of color.
After blushing your face you will notice a big change on your face.
Step 8: Using a setting spray
After your are done with the rest of the makeup, you need to set your face to make your makeup last longer.
Since you have already applied blush on top of the finish powder, there is chances your makeup will come off. A setting spray will also give your makeup some color on top of the blush.
- Start shaking the setting spray bottle well to remove the air bubbles.
- Spray in the air first before spraying your face.
- You can then spray your face from a distance and in circular motion. This eliminates the chances of a lot of product falling on one part of your face.
After setting spray you can be assured your makeup will last at least five times longer and waterproof.
Step 9: wash your beauty blender and dry it up
If there is a huge mistake that people normally do is store their sponges damp and with product in it. I once forgot to wash my beauty blender and stored it wet and with product on it. Rather, I just assumed nothing would happen so I just assumed.
Since I normally don’t apply makeup when am staying indoors, I did not check the sponge for a week or so.
When I was about to use the sponge, it had black spots on it. Which am sure if I had used it, I would be dealing with very ugly breakouts.
So, ensure you clean and dry up your sponges after use. I will create another guide on how to wash your makeup tools that you should make some time to read.
Conclusion
Although most people normally use a concealer brush to apply and blend in the concealer. However, there are other effective ways you can use to blend in your concealer.
One of the other ways makeup artists use to apply and perfectly blend concealer is using a dampened beauty blender. A dampened blender will lock in the moisture in your skin and also blend in the concealer without leaving any creases.
Using a dampened beauty blender to apply concealer might seem so obvious. However, if you do or wrongly, there are high chances that you are going to spoil your whole makeup. And since I don’t want you spoil your makeup, I have written a step-by-step process you can use to apply concealer using a beauty blender. After that you should subscribe to this page for more beauty hacks.
References
- Vaideanu, M., Banciu, A., Radulescu, D., Ionica, D., & Nita-Lazar, M. (2020). Microbiological efficiency tests of the cosmetic tools disinfection procedures.
- Hall, A. (2021). Racism in the Beauty Industry.
- Alharbi, N., & Alhashim, H. M. (2021). Identification of pathogenic microbes in tools of beauty salon in Jeddah City. Biosciences Biotechnology Research Asia, 18(4), 743.


